


eHomeAutomation App Demo with gizDuino IOT-644
22 Oct

Posted By
0 Comment(s)
3462 View(s)
Demo Video
On this blog we have new project and we'll share with you the eHomeAutomation apps works with gizDuino IOT-644 (built-in W5500 wiznet module) which controls the devices via WLAN . Continue reading this blog to know more about Home Automation Projects.Material used
1 x gizDuino IOT-6441 x USB Cable Type A -mini B
1 x LED shield (Optional - for LED indicator)
1 x 4-Channel Automotive Relay 12V
1 x 12V Adaptor (PB-1320-01C)
1 x 7V Adaptor (0322B0730)
6 x 1pin Jumper Wire M-F 40 cm
2 x 1pin Jumper wire M-M 40 cm
I'll just give you an idea about the cost. Its only P 2,611.00 (of all the items above)
Provide other materials such as
1 x UTP cable 1meter (Straight)
1 x WLAN Router
Illustration Diagram

Instructions
Router- Set your router gateway to 192.168.0.1 port 80 and subnet 255.255.255.0.
UTP cable
- Router to gizDuino IOT (Straight)
- Router to Laptop (Cross)*optional
Wiring Diagram
4-channel Relay 12V to gizDuino IOT
See the Illustration DiagramVCC to +5V
IN4 to Digital Pin 8 (Fan)
IN3 to Digital Pin 7 (Light 3 available)
IN2 to Digital Pin 6 (Light 2 available)
IN1 to Digital Pin 5 (Light 1)
GND to GND
For Power Supply:
12V Adaptor (PB-1320-01C)
CAUTION: HIGH VOLTAGE! DO THIS AT YOU OWN RISK. (Make Sure you follows the safety precaution - relay contacts has pins at the bottom, use anti-static mat or place it on a non-conductive surface)
gizDuino IOT
External Power Supply: 7V Adaptor (0322B0730)Uploading the Arduino Sketch
1. Open Arduino IDE 1.0.6 version.
2. Open the EthernetWebServer.ino then modify some line of codes in SSID, PASSWORD sections
Note: Do not change the default IP address 192.168.0.200 because this will be the ip communication for home automation app on your mobile phone.
The code
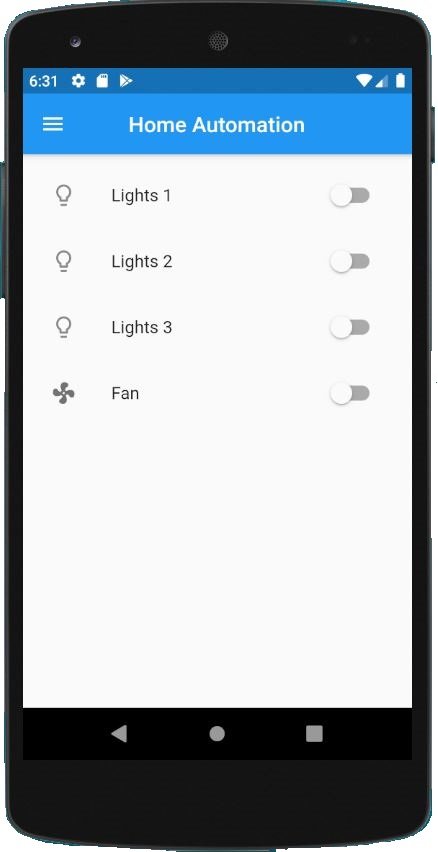
About the app
Install the ehomeautomation app (apk download here)![]()
From your phone go to your Settings> Wifi settings> connect to your ssid and password.
Now OPEN the apps (Actually you do not need to type or anything the ip address, it just automatically connected)
Enjoy!
Here's behind the mobile application.
Click the 3 lines on the top left corner to visit our website and subscribe to our Youtube channel..

Stay tune on this blog post updates, we will be added web browser page so that you can control your device with your laptop/desktop computer.
or you can do this by modifying the code from the EthernetWebServer.
App reference: Flutter Applications
Leave a Comment