eTempMonitoring App Demo with NodeMCU ESP8266
23 Oct


Posted By
0 Comment(s)
12251 View(s)
Published: 2020-10-23 16:15:42
Demo Video
Want to monitor your room temperature or other places in your house/office> If yes, install the eTempMonitoring app, it can easily get the data via wireless connections. Of course you need the following materials.Materials used
1 x NodeMCU ESP8266 module1 x NodeMCU Backplane
1 x DHT 11 breakout board
3 x 1-pin Jumper Wire F-F 20cm
Its only P 371.50 (of all the items above)
Provide other materials such as
1 x USB Cable Type A - micro B
1 x WLAN Router
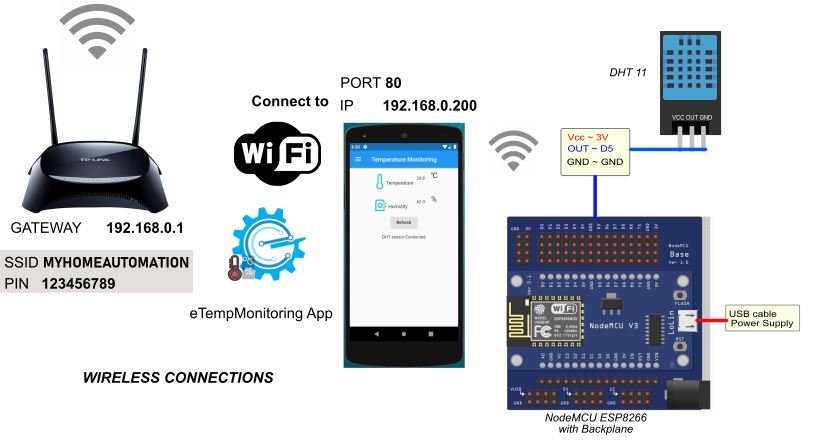
Illustration Diagram
Instructions
Router- Set your router gateway to 192.168.0.1 port 80 and subnet 255.255.255.0.
Wiring Diagram
DHT11 to NodeMCU
See the Illustration DiagramVCC to 3V
OUT to D5
GND to GND
For Power Supply:
Use USB type A - microUSB
Uploading the Arduino Sketch
1. Open Arduino IDE 1.8.13 or latest.
2. Add the HomeAutomation and DHT Library.(Download here)
2. Open the TempReading.ino then modify some line of codes in SSID, and PASSWORD sections
Note: Do not change the default IP address 192.168.0.200 because this will be the ip communication for Temperature Monitoring app on your mobile phone.
The code
About the app
Install the etempmonitoring app (apk download here)![]()
From your phone go to your Settings> Wifi settings> connect to your ssid and password.
Now OPEN the apps (Actually you do not need to type or anything the ip address, it just automatically connected)
Enjoy!
Here's behind the mobile application.
Click REFRESH button to update the display.
Click the 3 lines on the top left corner to visit our website and subscribe to our Youtube channel..
Please leave a comment or some suggestions. Thank you!
App reference: Flutter Applications


-50x50w.jpg)


Leave a Comment